Sunday, March 28, 2010

Built on an Island

This summer home was built on the island of Mustique in the Grenadines. Before building began, rocks and boulders had to be dislodged from the cliffside using dynamite and jackhammers .All the hard work was well worth it as the result was this gorgeous view of the turquoise waters, white-sand beaches, and barren coastline.

Perfect Placement

Weather proof furniture to relax in and enjoy the view from the veranda.

Thoughtful Design

Natural materials inspired the home’s exterior palette with walls the colour of wet sand. This pergola adds shade and structure to the pool terrace.

Sweet Sleep

A high, vented roof and ceiling fans keep hot air from building up in the bedrooms. The white paint and fabrics contribute to this bedroom’s cool feeling.

Wide-Open Spaces

The only glass in the house’s architecture is in the French doors to the veranda. The wide openings provide cross-ventilation and expansive views of the ocean from nearly every room in the house.

Relaxing Environs

Another photo of the veranda overlooking Pasture Bay. Maybe I would add a hammock and take a nap listening to the soothing lullaby of the waves.

Have a happy Sunday!

All images from Coastal Living.

Saturday, March 27, 2010

Interior Designer Lyndsy Woods

I love the way interior designer Lyndsy Wooks mixes styles and uses cream and earthy colours to make these elegant but warm and livable rooms.
She has her own company L Kae Interiors. Hope you like these photographs I selected for you.


Sit in this rocking chair with a good book and have a splendid weekend!
All images from here.

Friday, March 26, 2010

Summer House in Florida

Good morning Friday, good morning dear readers. Remeber the movie The Truman Show? With Jim Carrey? Well, the house we are going to see today is built in the town where the movie was filmed.

I had seen and admired a couple of photos of these rooms but not the house they belong to until now. This summer house is located in a place called Seaside in Florida. It was in this town where the 1998 movie The Truman Show was filmed.

Seaside was founded in 1981 and it is the first town in the United States to follow the precepts of the New Urbanism: a movement in city planning that favors the pedestrian over the car, that believes that all residences should be a short walk from the town center, and that tries to foster a sense of community—of people actually living together. The idea of this easy going town was concieved by developer Robert Davis and designed by Miami architects Andrçs Duany and Elizabeth Plater-Zyberk.

Now this particular residence was built and designed by Robert A. M. Stern Architects.


As you can see in this photograph the high dunes block an ocean view from the first floor, so they had to come up with a solution to give the living and dining rooms a view of the ocean. What they did was to reverse the usual placement of rooms. Three of the four bedrooms are on the first floor, and the living and dining rooms are on the second floor, where the bedrooms usually are. The master bedroom, which has the best view of all, is on the third floor.


Painted coffered ceilings in the living room and dining room. Built in shelves flank the fireplace. A huge area rug brings the living room neatly together.


The dining room is in the same area as the living room. You can see the same built in shelves in the previous photo.


The kitchen’s pocket doors open to views of the town. Didn't know I liked yellow kitchens. But I do!


This porch with a magnificent sea view is right off the living room. If you have a look at the first picture you can see this porch with its curtains on the second floor facing the sea. There are other houses quite near so the curtains here offer privacy. The house has three porches, one on each floor and all facing the ocean.


The guest room off the entrance hall. Stone and marble floor.


One of the children’s bedrooms has a built-in sleeping nook.


On the first floor, facing the dune there's the children’s screen porch with wicker furniture and enclosed by French doors. I like the detail of the lanterns attached to the columns and the hanging settees.


The master bedroom on the top floor opens onto a porch.


To support the porch roof, Stern conceived a dramatic single column.


The south façade.

All images and information from Architectural Digest.

I have linked this post to Toot your Horn Tuesday at Leah's blog and also at SimplySweetHome where Jerri is hosting a MckLinky party. Thanks Jerri!

Thursday, March 25, 2010

The Skinny on Buying Roman Shades: Custom Vs. Standard

I love roman shades.  I use them on pretty much any & every window that needs privacy.  (Shutters are beautiful too but we'll get into those another time.)  There are so many different types and price points that I thought it might be helpful to break it down. 

1.  The main materials that can be used for roman shades are
 fabrics:

{A room by Steven Gambrel}


 and natural woven materials:


{Image Source unknown via Little Green Notebook}

2.  There are many cases when roman shades are beautiful/ functional on their own & should be used alone.  It offers a clean, simple look.  Here in the kitchen, is a kid-friendly solution (i.e. no food mess on curtains) with custom natural woven roman shades with privacy lining:


{Our breakfast nook, smith + noble tortoise shell bamboo waterfall shades}


 A client's living room (pictured "before" below) had a set of french doors on the left side and a double window on the right side.  When I first arrived, I knew we needed to fix the imbalance of having curtain panels on one side and not the other:


{Client Living Room Below}


Because the door wouldn't have been functional with curtain panels, and because I wanted balance, I used roman shades only (no curtains) on both sides.  I wish I had a better view of this room, (I still need to go back for finished photos)  but I had custom pleated balloon shades installed behind the newly added crown molding for a seamless casually elegant look:


{A client's living room.  My task was to keep all existing furnishings, artwork, etc. and update it.}

3.  I also love to layer roman shades with curtain panels. It's functional (panels can remain stationary and roman shades go up & down for privacy) and beautiful (You get 2 opportunities to add texture/ pattern to a room instead of just 1.)  It adds layers & creates a warmer look than curtains alone.  They can be mounted inside the window or outside the window. 

I often have them mounted above the window and outside of the trim ("outside mount") to allow as much of the window to show as possible and to give the illusion that the window continues higher than it really does which visually heightens the entire room.  (It makes smaller rooms feel more spacious and large-medium rooms feel grander.)  I did this in a client's living room here:

{A client's living room:  custom lined linen curtains & custom natural woven roman shades with privacy lining}

In my own living room, (below) I used non-custom cotton roman shades from Sears.  (The color I used was "natural" and it looks like a warm white.) I mounted them outside the widows (again, to give the illusion of larger windows and also to hide the window frames on my old 70s window) and I paired them with "custom" (I made them myself because I couldn't afford to have them made) unlined white linen curtains. (I went with unlined linen because I love how the light shines through & it's a natural, relaxed look.) 

{Our dining room}

Here (below) I used the same non-custom Sears roman shades in "white" in our family room with no curtains.  Because of our budget, in our house I try to use non-custom shades wherever I can.  The cost difference between custom and non-custom is amazing.  (Approx $30 for the noncustom Sears shades below and maybe around $150-$250 or so- depending upon fabric- for a custom version.) 


4.  Custom vs. Standard Fabric shades:  Let me be frank: you get what you pay for.  The ONLY reason I don't have custom shades on every window in my own home is because we can't spend money there right now.  I love the look of certain standard shade styles but there is a difference in quality.  Custom shades pull up & down smoothly & evenly, whereas I have to play with some of my my non-custom shades to get them to hang right & evenly.  (Sears' larger sizes - 48" and up I think) are much of a better quality than their smaller sizes.  They use a metal chain pulley system and go up and down smoothly but I've noticed there's a slight varience in the color of the fabrics between the large and small sizes--- arggg.  But the price was right.  My advice is to buy the best you can afford.  Consider the non-custom shades to give you the look you want and plan on upgrading in the future if you want/ need to.  Custom fabric shades are made to order so you you can use any fabric you like and the style selection is practically endless.  Use a local shades fabricator to get the exact fabric and style you need.  (If you don't have one, consider hiring a decorator/ designer to assist.  Calico Corners also makes custom shades.)  This typically costs more than going with a company like smith + noble who has a limited selection of fabrics to choose from. 

5.  Custom vs. Standard Natural Woven Shades:  If you simply want the look and won't be using them often (in a space where you don't really need the privacy) I recommend the non-custom shades for a great look without the expense.  In our toddler's room we went with the non-custom unlined natural woven shades from Home Depot (for around $40) because he's so short anyone looking in wouldn't be able to see him anyway when he's not dressed.  (And of course because these shades would have been close to $400 if they were custom.)  The shades are also over the bed & so would be a pain to open & close whether they were custom or non-custom, but I love the look of these Home Depot shades for anyone who wants "the look" without the functionality & privacy needs:


{Our toddler's bedroom}

Again, you get what you pay for.  If you need high-quality. smooth & easily operables shades, then you will need to pay more. 

6. Tips for non-custom natural woven or "matchstick" shades:  Most non-custom companies sell their natural woven shades unlined.  A few have liners you can purchase and add on separately.  You could also attempt adding your own lining if you're crafty.  The unlined shades significantly darken the room and filter the light but at night they're virtually see-through from the outside when your interior lights are on.  Just google "natural woven roman shades"/ 'matchstick shades" and a bunch of options will pop up.  (Target, Home Depot, Sears all have them online.)

7. Tips for Custom natural woven roman shades:  I love smith + noble's selection of natural woven roman shades.   Different materials vary in prices.  There are a lot of other amazing brands out there but I simply used smith + noble first and loved theirs.  I've heard great things about many other companies and will surely be trying some out in the future.

The decision to go with fabric shades or natural woven shades depends upon the feeling you want your space to have.   Go here to check out some different styles of fabric roman shades.   

I hope this helps & good luck!!
xoxo,
lauren

Photographer Morten Holtum

Do you like black & white rooms? Because today we are going to have a look at Danish photographer Morten Holtum's work which is mostly B&W.

1.


2.


3.


4.

What seems to be a pouff by the sofa is really a hairy dog. Just snoozing.

5.


6.

A little blue, too.

7.


8.


9.


10.

I can picture myself lying with my feet up on the mantel, reading a book in the nook.

11.


All images from Morten Holtum's portfolio.

Wednesday, March 24, 2010

Guest Blogger Before & After: La Dolce Vita

Today for out Guest Blogger Series, please welcome super-stylish Paloma of the beautiful blog La Dolce Vita!

{After: Our Guest Bathroom}

I was so excited when Lauren invited me to share a before and after on her wonderful blog, though I must admit, I was a bit intimidated. After all, Lauren is the queen of fabulous DIY projects! I don’t know how she manages to do it all, but she does so beautifully and with grace and kindness.

My before and after is of my guest bathroom which after a few very simple steps, was transformed from drab and predictable to something my husband and I absolutely love!


{Before: The Guest Bathroom circa 2007}

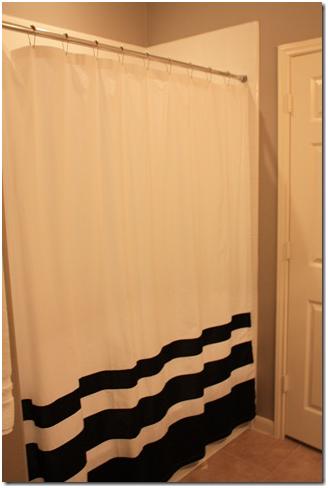
The guest bathroom featured a plain, white shower curtain, the requisite blue and brown combination that everyone was doing, and the original walnut cabinets. Looking at this makes me cringe now. The paint color (Benjamin Moore’s Plymouth Rock) is about all that remains.


I had spotted this shower curtain at Target, which reminded me of Kate Spade’s which was featured in Domino a few years ago. I sort of built my vision around it and got to work. I love the look of the curtain with the framed fan coral and monogrammed towels.

{Kate Spade’s Shower Curtains}


{The $30 Target Version}


I have always been partial to the look of white linens, so I ordered these towels from Pottery Barn and had them monogrammed. While I love the look of white towels, they are not always practical, so the linen closet is filled with graphite-colored Cynthia Rowley towels for guests to use when they visit. You’ll notice the hand towels are also graphite. I thought it was a nice, coordinating color.


We completed this project right before Christmas. In September 2009, we traveled to London and in the summer of 2008, I traveled to Spain. I took some of my favorite shots from both trips, framed them, and hung them in the bathroom to add some interest. I chose to print the pictures in color. I thought that having black and white photos would just be too much in a predominantly black and white room.


On the Vanity: A Potted Orchid, Handmade Mexican Pewter Towel Ring, Archipelago Botanicals Diffuser, and a little Japanese bowl from Anthropologie.


The greatest impact came from painting the cabinets gloss black. We couldn’t spend the money for a new countertop and sink, so a little can of paint gave us a lot of bang for our buck! It created contrast between the cabinets and the counter which just wasn’t there with the original walnut cabinetry. If you look at the first two images in this post, you’ll notice the difference is huge!


We contemplated getting a new mirror for a while and a few weeks ago, I suggested that we buy some plain wood trim from Home Depot and paint it gloss black to match the cabinetry. Again, I think this choice made a tremendous impact and really completed the project. Not bad for a project that cost about $15.

I’d say the overall transformation of our guest bathroom cost about $300 and we are very pleased with the difference it has made. Thanks again for featuring my before and after, Lauren!

______________________________________________________
 
Paloma- What a huge difference the simple changes made- it's fresh, up-to-date & graphic & very "you!"  I love the huge monograms on the towels and the black touches throughout.  Painting the vanity really made the space feel so much bigger & prettier.  (And all for only $300?!!  awesome.) Thank you so much for sharing your guest bath transformation with us!!!
 
xoxo,
lauren